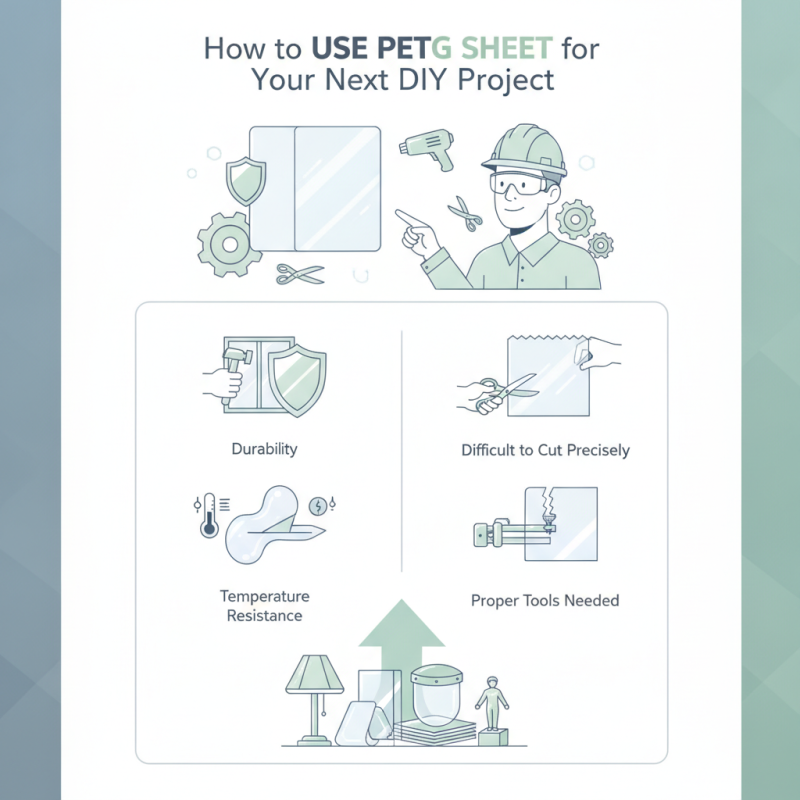
How to Use Petg Sheet for Your Next DIY Project
When considering materials for DIY projects, Petg Sheet stands out for its versatility. Industry expert Michael Turner states, "Petg Sheet is the future of DIY." His experience with this material sheds light on its immense potential.
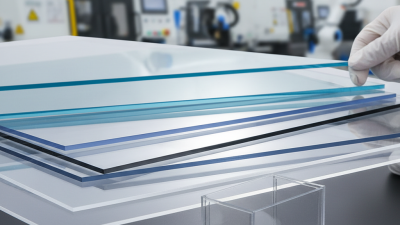
Petg Sheet is both durable and easy to work with. This material is known for its excellent clarity and toughness. Many crafters and builders appreciate its ability to withstand impact and temperature changes. However, it can be challenging to cut precisely. Some users report difficulties achieving clean edges without proper tools.
With the right techniques, Petg Sheet can be an excellent choice for various applications, from creating custom displays to protective barriers. Understanding its properties is essential for successful projects. By exploring all its strengths and weaknesses, you can effectively harness the advantages of Petg Sheet in your next creative endeavor.
Understanding PETG Sheets and Their Properties
PETG sheets have gained popularity in recent DIY projects due to their unique properties. This thermoplastic material combines durability with flexibility. It is clear and can resist impact, making it a great choice for various applications. The sheets are also easy to fabricate, allowing for intricate designs without much hassle. You can cut, bend, and shape PETG sheets with basic tools. However, it’s important to understand the limitations. Overheating can lead to warping, so controlled heating is necessary.
In addition to their strength, PETG sheets are resistant to chemicals and moisture. This makes them suitable for outdoor projects as well. However, one should be cautious of UV exposure, which can degrade the material over time. When working with PETG, some might find that adhesives may not bond well. Experimentation with bonding techniques is essential for optimal results.
Despite these challenges, the versatility of PETG sheets in crafts and functional items is undeniable. The creative possibilities are vast, but understanding the material fully can lead to more successful outcomes.
Tools and Materials Needed for Working with PETG
When embarking on a DIY project with PETG sheets, it's essential to gather the right tools and materials. A good starting point includes a precision knife or utility knife, which is essential for clean cuts. A laser cutter can offer more precision, especially for intricate designs. Don't forget to have a heat gun handy. It can help reshape PETG sheets effectively. A ruler and a cutting mat will ensure accurate measurements and protect your workspace. Incorporate safety gear, such as goggles and gloves, to protect yourself during the cutting and shaping processes.
According to a report by the Plastics Industry Association, PETG's popularity has surged due to its excellent thermal properties and ease of fabrication. This makes it a top choice for DIY enthusiasts. However, working with PETG is not without its challenges. Sometimes, achieving the perfect finish requires multiple attempts. The plastic's tendency to warp under high heat can also lead to frustrating outcomes. It's important to note that, while PETG is relatively easy to work with, beginners might face a learning curve.
**Tip:** Always preheat the PETG sheet before cutting. It can ease the cutting process, making it smoother and less likely to crack.
Another consideration is the adhesive. Choose the right one, as some can leave a residue. It could affect the final appearance of your project. Before starting, practice on scrap pieces to build confidence in handling this versatile material. This approach will save time and reduce waste in the long run.
Popularity of Different Filament Types for DIY Projects
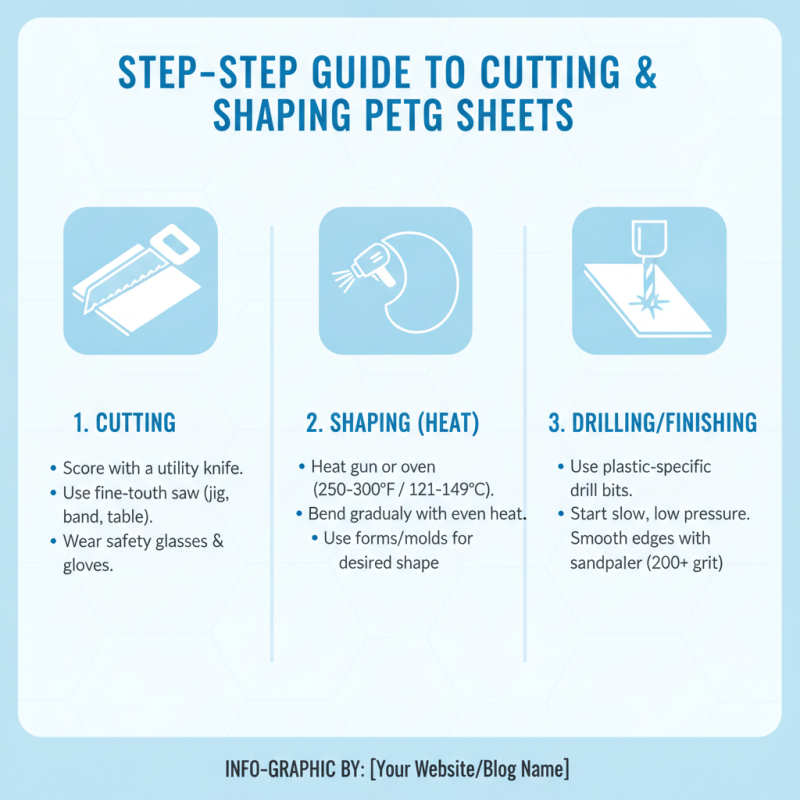
Step-by-Step Guide to Cutting and Shaping PETG Sheets
When working with PETG sheets, precise cutting and shaping are essential. PETG, or glycol-modified polyethylene terephthalate, is favored for its durability and clarity. A recent industry report indicated a rising demand for PETG in DIY projects. This trend is partially due to its ease of manipulation and excellent impact resistance.
To cut PETG sheets, use a sharp utility knife or a laser cutter for intricate designs. Score the surface lightly first, then snap the sheet along the score line. The recommended cutting thickness is usually 3-5 mm to ensure clean edges. Many DIY enthusiasts mention that achieving a perfect cut can be challenging. Small imperfections in cutting can lead to gaps in seams or alignment issues later in the project.
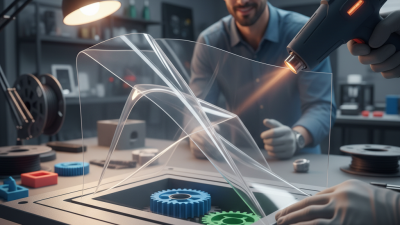
Shaping PETG requires careful temperature control. Heating the sheet to around 150°C makes it more pliable. Use a heat gun for localized warming. However, overheating can cause warping, which leads to frustration. A report from the Society of Plastics Engineers notes that improper heat application can result in a loss of structural integrity. Proper practice and consistency can enhance your outcome.
Tips for Joining and Finishing PETG in DIY Projects
When working with PETG sheets in your DIY projects, joining and finishing techniques are crucial. Start by ensuring a clean surface before joining the sheets. Dust and grease can compromise the bond. Use a heat gun or a soldering iron for welding edges together. Be cautious; overheating can lead to warping. A good practice is to test on scrap pieces. Sometimes, the results may not turn out as expected, leading to adjustments in technique.
For finishing, sanding is important to achieve a smooth surface. Begin with coarse grit sandpaper and gradually move to finer grits. Don’t be discouraged if it takes longer than usual. This process can reveal imperfections that need addressing. Additionally, consider using a clear coat for protection and improved aesthetics. It’s okay if your first attempt at finishing isn’t perfect. Learning from mistakes is part of the process. Experiment with different methods to find what works best for your project.
Creative Applications of PETG Sheets in Home Projects
PETG sheets have become popular among DIY enthusiasts for their versatility and durability. You can use them for a variety of creative home projects. For instance, they work great for crafting custom shelves or organizers. Their clarity allows you to showcase items in a visually appealing way. It's a fantastic material if you want something that’s both functional and stylish.
Making a greenhouse or a small garden enclosure is another great way to use PETG sheets. The impact resistance of this material is excellent. It withstands harsh weather conditions while allowing sunlight to pass through. This helps your plants thrive. You may find it tricky to cut clean edges, so take your time. It’s crucial to plan your cuts before starting.
Another interesting project is creating decorative wall art. The sheets can be cut into various shapes and sizes. You can layer them for added depth in your designs. However, achieving the right balance of colors and layers might take some trial and error. Experimenting with different techniques can lead to unique results that may surprise you.
How to Use Petg Sheet for Your Next DIY Project - Creative Applications of PETG Sheets in Home Projects
| Project Idea |
Description |
Benefits |
Skill Level |
| DIY Greenhouse |
Using PETG sheets to create a small greenhouse in your backyard. |
Durable, UV resistant, and clear for sunlight. |
Intermediate |
| Furniture Protection |
Creating protective covers for tables and outdoor furniture. |
Waterproof and easy to clean. |
Beginner |
| Art Display |
Using PETG for framing and displaying art or photos. |
Lightweight and enhances visibility. |
Beginner |
| Home Decor Items |
Creating unique home decor pieces like wall art or shelving. |
Versatile and customizable. |
Intermediate |
| Aquarium Cover |
Using PETG sheets as a cover for aquariums. |
Safe for aquatic life and prevents evaporation. |
Intermediate |
 1Durch die gruppenweite Einführung und Harmonisierung unseres integrierten Managementsystems (IMS) werden alle bestehenden Unternehmens-, Qualitäts-, Umwelt- und Energiepolitiken durch diese Unternehmenspolitik ersetzt. Der Slogan „Textil hat Zukunft – auch in De